For those of you who maybe haven't seen the Cricut 360 blog yet- go check it out here.... http://cricut360.blogspot.com/
Cricut 360 is a new challenge blog that is starting up later this summer....they are actively seeking designers, so I thought "why not?" and made this card as my submission.
I try to keep my projects simple, so anyone can look at them and think to themselves "ya, I can do that too".
This is a 5x5 card. Heres what you will need:
1- 10x5 inch strip of paper for the card base
1- 4.75x4.75 inch piece of paper for the 1st layer
1- 2x4.75 inch piece of paper for the 2nd layer
Corner Rounder
Crop-A-Dial
6 eyelets
Cricut image of your choice
Scrappers Floss
Chalk Ink
Adhesive and pop dots
Stamp of your choice
You really could stamp just about anything on this card. I chose best wishes because someone I know will be changing jobs soon, and since caterpillars also experience change, I thought it appropriate.
Best wishes to all who enter the DT Call. I'm sure this blog will have many new and exciting projects for everyone to see!
All the best,
Sue-Ann
Showing posts with label Cricut. Show all posts
Sunday, May 22, 2011
Sunday, April 17, 2011
Cricut Inks
For the very first time today, I used the ink inserts for my Cricut!! This is the finished product...
I used the Paper Lace Cartridge that I got last week (finally!) and I'm really loving it. I should have got the cartridge a long time ago- just kept waiting for a better price on it... I have a hard time spending a lot on cartridges....if anyone has any scoop on the best place to get them cheap let me know!
Since the pattern on this card is rather busy, I decided to keep it super simple and just tie a little bow with some orange ribbon to match. It was super easy to use the inks- I'm not sure why I was so intimidated by them....will have to use them again for sure!
Hope everyone had a great weekend! More to come next week..I've been working on 2 big events for work, one we completed yesterday, the other will be tomorrow...so shortly I will have a lot more time to make some stuff- and I've got some great ideas floating around in my head!
Thursday, March 31, 2011
Stars and Buttons
Guess who is gonna get this card??
Off it goes to my favorite USAF JAG Officer!
The blue stars and the ribbon came from the Stand and Salute Cartridge, I got this huge bag of multi-size clear buttons for next to nothing and used some white scrappers floss for the bows. Now the buttons will make this card "un-machineable" for sure. So its either got to go in a care package or I'll have to pay a special visit to the post master for correct postage......but knowing me, it will probably go into a care package....got to go back to my roots as a Army Wife and spoil my servicemen who are deployed or stationed away from family!
Friday, March 18, 2011
Thursday, March 17, 2011
Quick Card...on my new Gypsy!
So I've been playing on my new Gypsy here and there when I can sneak some time this week- and I just LOVE IT! I've got 6 projets saved on it and I really feel like I am getting more out of my cartridges. Which, for the amount of money spent on them, is a really really great thing!
Here is a quick card I made to send across the US with an order of Girl Scout Cookies...
I think the thing I love most about the Gypsy is that you can lay out all the paper and know exactly where the image is going to cut. There is NO guessing! I got every piece of paper I needed onto this 6x12 mat for my Cricut Create.
And here it is all together:
For some reason the picture is a little out of focus, and since I already packed up the cookies and the card, I cant take another photo!
I thought I had the word "cookies" welded correctly, but my C and 1st O didn't weld so its a little not right there, but it add character, right? And belive it or not, this whole card was made from scraps. Yep. that 5x5 brown and green paper were in the scrap pile. Im THAT girl that cuts 2 inches from a 12x12 and considers the 10x10 thats left a scrap! You should see my scrap pile!
Tuesday, March 15, 2011
Tags
While trying to clean up my posting history, I found this post from last month that I thought I had posted, but I guess I didn't.
These were just some tags I had made for a few different Valentine's Day Projects.
The first is the tag that went on the Memo Boards I had made for the girls in my office. These were done at 3 inches, the bright pink layer was sprayed with some shimmer mist, and the heart had a pop dot behind it. I lucked out at Michael's and got a set of heart eyelets. While this one came out OK, I wouldnt buy them again- regarless of the setting I used, the eyelet either cracked, the paint chipped off, or it lost its heart shape! Lesson to be learned in there somewhere!
These tags went on all of these Memo Boards:
The following tags were made for the cookie bags the people in my surrounding offices, and for the staff at my husbands job.
Super easy- A banner cut from the Cricut Sampler Cartridge, a heart made with a Creative Memories shape punch, and a My Pink Stamper Stamp. I chose to use a large silver eyelet on these tags becuase I was using 3 peices of curling ribbon and wanted to make sure the tag wouldnt rip when I tied the bags.
Monday, March 14, 2011
Cricut Bags by JoAnn
I'm super lucky to be able to surround myself with many crafty ladies! Meg's mom, Jo Ann, recently started paper crafting with us having sewed for many years. For the longest time Meg was the only scrapper with a Mama Cricut- the rest of us just had babies. So Meg would tote Mama to and from home and here there and everywhere without a bag. For the amount of traveling Meg did, and how much she used it at home, it didn't make sense to spend a lot of money on one of the fancy travel bags that are marketed for the Cricuts. It would never be in the bag! Now, Jo Ann starts paper crafting with us, gets her own machine, and the ideas just start flying! Meg actually surprised me with this bag one night when we were out to dinner with our husbands..I was SO excited! Its so cool!
I believe this is left over fabric from the cover Jo Ann made for Meg's Papazan Cushion and Jo Ann even made name tags for the bags! The reverse side of the tag has my full name on it, and even a 3D embellishment to make it POP!
Now, I own the Cricut Create, if you want to see the larger bag she made for the Expression Machines, click on over to Megs Blog Post : Cricky Travel Storage
I haven't tried it yet, but I think theres even room for 'Lil Miss Gypsy in there too!
THANKS JO ANN!!! I LOVE MY BAG!!!!
Tuesday, March 8, 2011
A Thank You Card...
This was a card I made a few days ago. When I started out I didn't know what I was going to make. I had taken out the Cricut "Tie the Knot" cartridge to do a My Pink Stamper Challenge about Birds, and then didn't do it...LOL. So I thought I should use the cartridge since I'd taken it out days earlier after digging through everything looking for the perfect birds. Since the bird idea had "flown out the window", I saw this cute flower and thought "I need those" ( I say this about many things!!!).
I used all 4 layer options, black on the shadow blackout, white for the shadow, pink for the flower and green for the leaves. I put all the layers together using Beacon's 3 in 1 Advanced Craft Glue which I have to say I LOVED. I was taken back at first by the strong scent of the glue- but quickly saw how great it works!
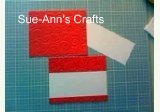
This is again a Standard A2 card from a chain craft store, the pink paper is cut at a 1/4 inch smaller than the card base and was embossed with the Sizzix Texture Boutique and a Sizzix folder from the Damask set I think---the folders themselves really should be labeled with their correct names! It would make it so much easier- guess I'll have to lable mine from now on. :-)
The White middle section is 2 inches wide and 3 3/4 inches long. Both the white piece and the pink backround have the edges chalked with black chalk ink from Creative Memories. I just wanted to give it a little more demension.
To add another touch of demension, I added a strip of black velet ribbon across the card.
The Stamp is actually from a Fiskars set I scored at Joann's for a crazy cheap price! It was in their clearance section for....wait for it.....$1.97!!!!!! Original price.....$15!!! That night I also got 2 sets of Inkadinkado stamps for 97 Cents Each! Those should have been $10 each! So a whopping $4 for what should have been $35 dollars in stamps. I think thats my best haul yet!
Hope you like it! Im really happy with it, especially since I didnt know what I was going to make when I started out.
I love reading everyone's comments...so if you were here, drop a line and say Hi!
Tomorrow is Wednesday- 1/2 way through the work week for most of us. Hope your week is going well!
PS- I actually made 5 of these cards, but only stamped one. Since its a card I can use for many different things, I can stamp them as I need one, that way the sentiment will be just right for the situation!
Sunday, March 6, 2011
St Patrick's Day Cards...
These are some of the St Patrick's Day cards I made...it was an adventure getting to the final product with these cards! I tried a few new things along the way, so they took a little extra time in design and a lot of trial and error too!
These are standard A2 size white card that were bought from a craft store chain.
The green paper is Core'dinations paper that was cut 1/4 inch smaller than the A2 card, put through the Texture Boutique with the Cuttlebug embossing folder "Pebbles". Once ebmossed, I sanding the raised sides to reveal the lighter green core color of the paper. And then of couse I used the corner rounder.
The Shamrocks were cut from Designers Calendar Cricut Cartridge (using Meg's Gypsy since at this point I hadnt caved and bought one yet---I have since then, and it should be here this week!). I used the rounded feature cut and the regular cut and they are cut at 3 inches (I believe). Before I applied them to the card, I sprayed them with some Gold Tattered Angels Glimmer Mist, and put pop dots on the back of them.
The Happy St Patrick's Day banner was done with a cut from the Cricut Sampler Cartridge, stamped with a stamp from the dollar section of a chain craft store, and when dry, it was chalked with 2 tones of green.
I stamped the outside front of the envelope with another stamp from the same dollar section of the store...I find some really great things in the dollar section- anyone else????
Over all, Im pretty happy. Originally, the green embossed papers had ripped edges, but I wasn't really enjoying the way they looked. Anyone have any tips on ripping paper? I would LOVE to hear them....I really want to try it more....but I never like the way it looks.....
Hope everyone is having fun gearing up for St Patrick's Day....after all, everyone is Irish on St. Patrick's Day! We will be sporting our Irishness at our local Parade- one of the best in the country....Can't wait!
Friday, March 4, 2011
A "Manly" Birthday Card
I love making cards, but seems to have a hard time making cards that aren't really girly, pink, or frilly...anyone else ever have that problem? I hope I am not the only one!
I dug though all my cricut cartridges and found this cute set of balloons on one. Since this was a 5x7 card, i cut the balloons at 3 inches and used white shadow cuts to make them pop-off the blue background. I also used some pop dots on the back to give them even more depth.
I of course used my Sizzix Texture Boutique to give the bottom some detail, and busted out the I-rock to add some studs for a little extra detail.
Eric loved his birthday card, and that's what it was all about!
Monday, February 7, 2011
My Pink Stamper Challenge!
Tonight, Robyn, My Pink Stamper, posted a challenge to make something about Spring, or something that makes you happy. Here is my project- a Dragonfly card.
Dragonflies remind me of spring, and summer too (we often see many of them up at the lake house we rent). The colors in this card, shades of pink and green, also remind many people of Spring.
Here's how I did it:
I love when people leave comments, so let me know you were here!!!
Here's how I did it:
- This is a 5x5 inch white card base that I rounded the corners on.
- 3 1/2 inch Dragonfly base and layers from the Circut CM exclusive Cheerful Seasons Cartridge. I used 3 shades of purple. Darkest for the base, next lightest for the overlay, and lightest purple for the top wing layer. I chose not to use the layer on the bottom wings. I used a light grey/light purple paper for the body of the dragonfly.
- After I layered it all up, I used my I-Rock to set 6 crystals in the wings and then applied a million (ok 8) pop-dots to the back (they were smaller ones!)
- I then layered a 5x5 piece of light pink paper with rounded corners, and a 4 3/4 x 4 3/4 piece of patterned green paper, also corner rounded, together and wrapped the double layer of ribbon around it, securing it to the back, and then to the card base.
- After putting on the dragonfly I left like it needed just a little something more so I took out 2 white paper flowers, chalked them in shades of purple, and applied them to the card, with an I-Rock stone in the middle.
I love when people leave comments, so let me know you were here!!!
Monday, January 31, 2011
Thank You BEARY much!
So it is pretty snowy here in New England- and there is more to come this week! We are running out of places to put all of it- you can only move it so far with a shovel or "regular" snow blower. The piles were so large at the end of our driveway that we couldn't see when pulling on to the street. Stan, my husband, works for a local dealership that sells landscaping equipment- sooo........he borrowed a tractor/snow plow/industrial snow blower!! We had a little roadside neighborhood party when Stan pulled up with the tractor- got everyone to move their cars and Stan was also able to widen our VERY snow-narrowed street.
Thankfully, Stan works right down the road from our house, so when he was done....he drove it right back to the shop (with me following in the car so he didn't have to walk home!)
So how do we say THANKS for letting us borrow this nifty little machine? I made a card for the shop owner!
Here is what I used:
Just to add a little extra something- I put some fine crystal glitter on the bears feet. Just to make them a little different from the "snow"!
Thankfully, Stan works right down the road from our house, so when he was done....he drove it right back to the shop (with me following in the car so he didn't have to walk home!)
So how do we say THANKS for letting us borrow this nifty little machine? I made a card for the shop owner!
Here is what I used:
- Cricut "Joys of the Season" Cartridge - Polar Bear Cut- All of these cuts were made with the "flip" feature on- the bear was originally looking to the right- I made him so he would look to the left.
- 2 inch bear shadow cut in light blue
- 2 inch regular bear cut in white
- 2 inch layer cut in bright blue
- DCWV "Winter Collection" Card - Size A2- in Blue
- K & Company layered snowflake accent (Meg snagged both the cards and the layered snowflakes on clearance at JoAnn Fabrics for almost nothing!)
- One border strip, 1/2 inch x 5 inch with one side cut with a wavy pattern
- Martha Stewart Fine Crystal Glitter
- Zip Glue Pens
- Adhesive Tape Runner
- Black fine point pen
- Assorted Cricut tools
Just to add a little extra something- I put some fine crystal glitter on the bears feet. Just to make them a little different from the "snow"!
Sunday, January 30, 2011
Valentine's Day Card- Mostly Finished!
I got to spend most of the day today in my craft corner- with my Kringle Candle Hot Chocolate Candle - which has made me one happy camper! I have my Valentine's Day cards almost done- they are just waiting on my order of My Pink Stamper Stamps! My order, along with Meg's should be here this week and I can't wait!
These were fairly easy cards to make- the photos were taken on my cell phone- so hopefully they are clear enough for you to see the detail.
I like to set my projects up "assembly line" style. I cut everything, piece the parts together if needed and then put it all togehter at the end.
The first thing I did since it takes a little bit to dry was to to take the 2 1/2 inch white heart and spray it with the Glimmer Mist. Because you are wetting the paper- it will curl. My little trick with this is to take a old cricut mat and line up the items you are going to spray on the mat. Sometimes the mats are not sticky enough to hold the paper while the machine cut, but they are still sticky enough to hold them while the mist dries. If your misted paper still starts to curl, just tuck them under a book for a few minutes after they are dry.
Now, lets start putting the pieces together!
These were fairly easy cards to make- the photos were taken on my cell phone- so hopefully they are clear enough for you to see the detail.
Heres what I used:
- Cricut Storybook Cartridge, 2 1/2 inch heart cut (red cardstock), and shadow cut (white cardstock), on my Cricut Create
- Red Cardstock (4 3/4 x 3 3/4)
- White Cardstock (4 3/4 x 2)
- Cuddlebug and Embossing Folder- Swirls' (thanks Meg!)
- Foam Dots
- Zig Glue Pens
- Tape Runner
- Black Ink Pad
- My Pink Stamper Stamps- Love-alicious
- Tattered Angels Glimmer Mist- Pearl
- Assorted Cricut tools for removing cuts from the mat and folding the cards
- 5x4 White Stock Cards (I like the pre-made cards because they are readily availble in the craft store and come with envelopes!)
I like to set my projects up "assembly line" style. I cut everything, piece the parts together if needed and then put it all togehter at the end.
The first thing I did since it takes a little bit to dry was to to take the 2 1/2 inch white heart and spray it with the Glimmer Mist. Because you are wetting the paper- it will curl. My little trick with this is to take a old cricut mat and line up the items you are going to spray on the mat. Sometimes the mats are not sticky enough to hold the paper while the machine cut, but they are still sticky enough to hold them while the mist dries. If your misted paper still starts to curl, just tuck them under a book for a few minutes after they are dry.
Now, lets start putting the pieces together!
Before I put the heart on, I used some of my Dimensional Foam Adhesives. Just remember- the thicker your card- the more it will cost to mail (if you are mailing it) so you might want to take it to the post office and have them check. You dont want your hard work coming back to you for more postage!
And here is our finished project! Well almost finshed anway- I need my Pink Stamper Stamp set to come so I can finish the front! To the right of the heart, I plan to use the stamp that says "All you need is love - John Lennon". Just deciding if I want to use red or black ink....
It is hard to see the glimmer mist accent in the pictures, but those who receive the card will notice!
This project didnt take long at all to complete. Everyone will think it did- but it didnt! And I think the people who are getting them will really enjoy them. Its alwasy so nice to get a homemade card!
Subscribe to:
Posts (Atom)